Using BitFaster 12
A Step-by-Step Tutorial
Introduction
This tutorial is intended to give you a quick overview on how to use BitFaster (all editions) and the email tracking service "BitFaster Results". You will also learn how to create your first Email Campaign, send it and then track it. Please keep in mind the following things:
We are assuming that you have already installed BitFaster Professional 12 on your Computer. If not, you can download the latest update from http://www.bitfaster.com.
If you have not yet started BitFaster, please do so now by using any of the shortcuts created when you installed the software.
|
If you are looking for more information on BitFaster Alerts (Transactional Messages), please click here. |
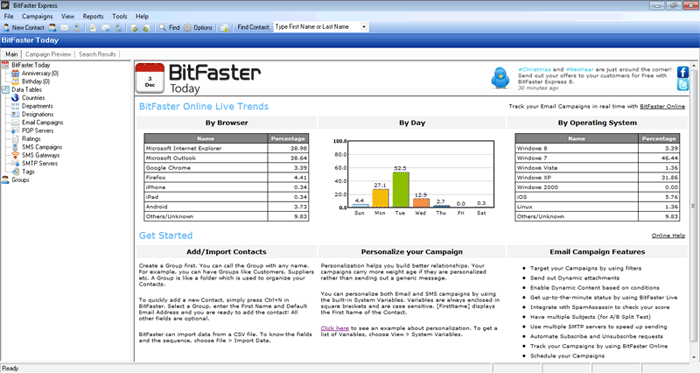
BitFaster Today
BitFaster Today is the startup page that displays a lot of useful information that's live from the BitFaster servers. The contents of this page are subject to change anytime. Our primary goal is to provide information that can help you design your campaigns better.
Step 1 - Create a Group
BitFaster stores your Contacts under Groups. A Group is a folder that can be used to organize your Contacts logically. For example, you could include all your customers or clients under a group named "Customers".
There is no limit on the number of Groups you can define in BitFaster. Similarly, there is no limit on the number of Contacts you can have under each Group. Start by creating a Group as shown below.
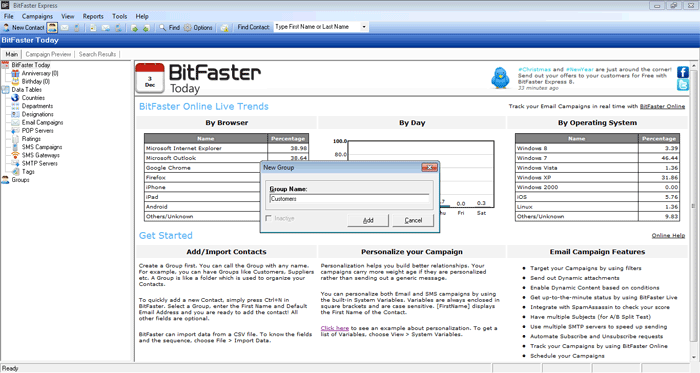
You can create a Group in many ways. The easiest way is to just click on the New Group icon in the toolbar (2nd icon from the left). A Group can be up to 100 characters in length and can include space character. You cannot have Contacts without Groups in BitFaster. Every Contact should belong to a Group.
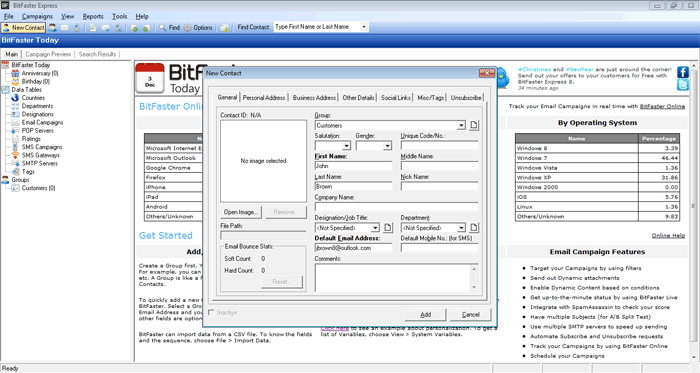
Step 2 - Add a Contact
Once you have created a Group, click on the New Contact icon in the toolbar (1st icon from the left) to bring up the New Contact window. You can simply put in the First Name and Default Email Address to add a Contact. Only two fields are mandatory in this case. Please note that BitFaster displays the label/caption in BOLD if a particular field is mandatory.
Step 3 - Using the Contact Manager
Click on the Contact Manager icon in the toolbar (3rd icon from the left) to bring up the Contact Manager window. Click on the Group in the left to view a list of all Contacts under it. As you can see from the screenshot below, the Group "Customers" is selected and the contact we just added above is shown in the list. The Contact Manager is a versatile tool which allows you to perform a number of operations on contacts. You can hover over the icons to see the explanation on what options are available.
The Contact Manager also allows you to quickly filter by names (starting letter) or even perform a quick search on any of the fields listed in the view.

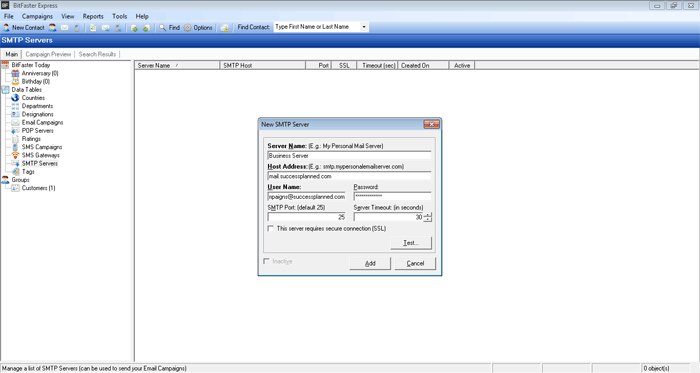
Step 4 - Add an SMTP Server
BitFaster needs an SMTP server to send out Email Campaigns. If you are using an email client such as Outlook for email communication, you have already configured an SMTP server before. Check the server details from your email client and then use the same details to add a new SMTP server in BitFaster. Without SMTP authentication, your email messages won't be sent by BitFaster.
The SMTP Port is 25 by default in most cases (if you are not using encryption). However, your host might provide alternate ports to bypass any ISP limitations. You should check with them in case of doubt.
To add a new SMTP server, choose File > New > SMTP Server from the menu bar. The Server Name is for your reference only; you can input any text that will help you identify the server you are using. The Host Address will normally be something like "mail.domain.com". The User Name could be your email address itself. Check with your System Administrator or web host in case of doubt.
Enter the details as shown in the screenshot below and click on Add to add a new SMTP server. If you wish to test this connection, you can click on the Test button. Please note that you will have to update the Notification Email Address in the Options window (View > Options) before you can perform this connection test.
Step 5 - Create an Email Campaign
You are now ready to create your first Email Campaign in BitFaster. We are assuming that you already have an HTML file designed that you wish to send out. If not, you can create a simple HTML page by using the built-in HTML Editor (Tools > BitFaster HTML Editor). Or click here to view a sample page.
To add a new Email Campaign, click on the New Email Campaign icon in the toolbar (4th icon from the left).
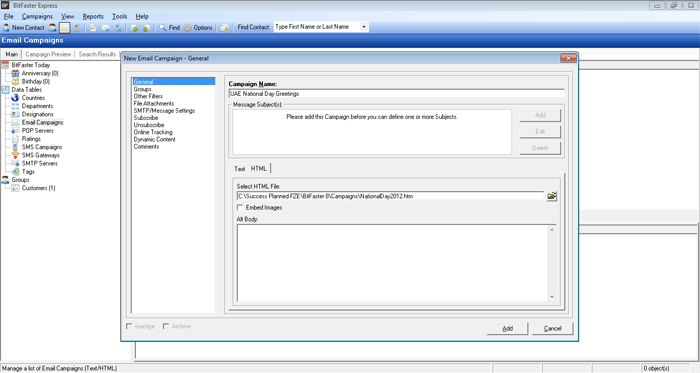
There are 8 tabs available to the left of the New Email Campaign window. The first one "General" is automatically selected when you open the window. Our objective is to create an HTML campaign.
To start with, enter a Campaign Name (up to 100 characters allowed). Also, enter the subject of the email you wish to send. By default, the HTML Campaign tab is selected. Select the HTML file you have created before. If you want to track your email campaign (as explained in steps 6 and 7 below), do not check the option "Embed Images".
Now click on the Groups tab on the left.
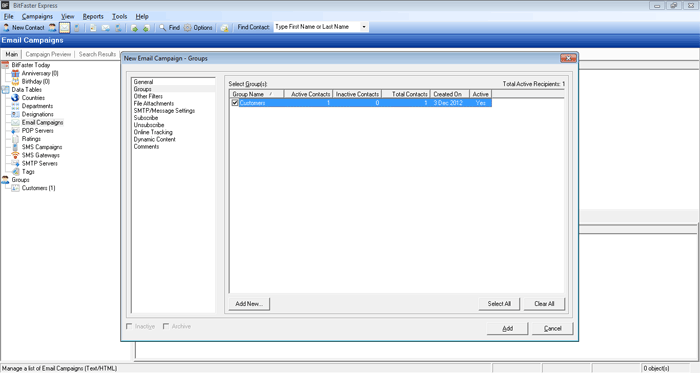
You can select one or more Groups from the list. This is the first level of filtering you can apply in BitFaster to target your campaigns. Now click on the SMTP/Message Settings tab on the left.
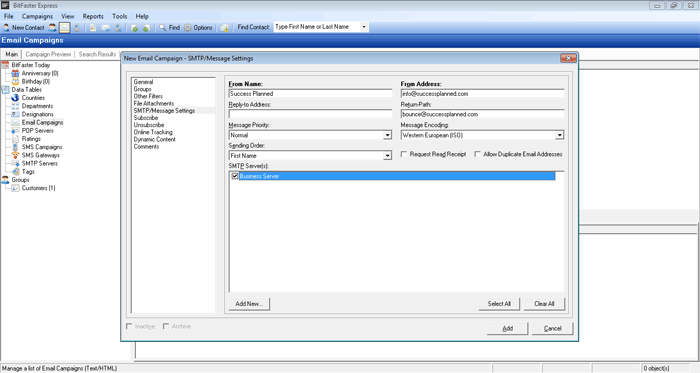
The information in this tab is crucial since it identifies you, the sender to your recipients. "From Name" and "From Address" are mandatory. You can either use your name or the company name in the "From Name" field and enter a valid email address in the "From Address" field. Keep in mind that the content of these fields are also important to ensure that your email gets past the anti-spam filters.
Other fields are optional and you can leave the default settings for those where applicable.
You are then required to select at least one SMTP server from the SMTP Server(s) list. You can use more than one server if you wish to balance your campaign load.
You now have enough information to add the email campaign. Now click on the Add button at the bottom of the window to add this email campaign.
Step 6 (Requires BitFaster Results Registration - Paid Service)
You can skip this step if you already have a registered account. This is a one time procedure.
Email Marketing can be very successful if you are able to get answers to questions like "Who, When, Where, How" etc. For example, it would be quite useful from the sales perspective to know who has viewed your email campaign and what links they have clicked on.
BitFaster can help you track your email campaigns. It provides numerous reports that can help you measure your campaign's success rate. In order to use the tracking feature, you should subscribe to our "BitFaster Results" service.
Once you have signed up, you will receive an email which contains the Customer ID and Pin. You need to update this information in BitFaster as follows:
This is a one time procedure.

Now make sure that you have selected "Email Campaigns" from the tree view in the Main tab. Double click on the email campaign (on the right pane) to bring up the Edit Email Campaign window. Make sure that the "Embed Images" option is unchecked in the General tab. If you have checked this option, you cannot track your email campaign.
Click on the BitFaster Results tab to bring up the screen as shown below. Now simply click on the Track this Campaign Code button. You will be asked to confirm.

BitFaster will now connect to the BitFaster Results server and get a new tracking code. Click on the Save button now to save the changes and close the campaign window.
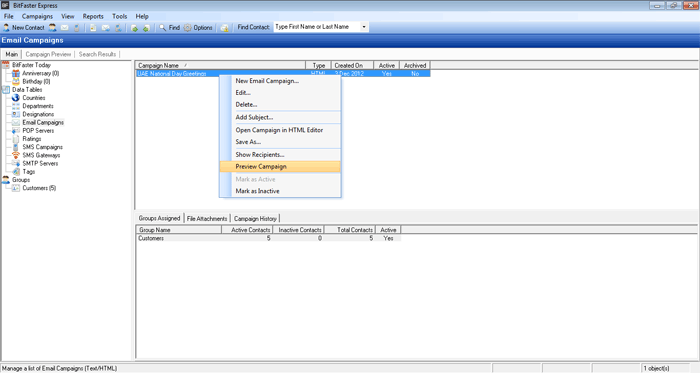
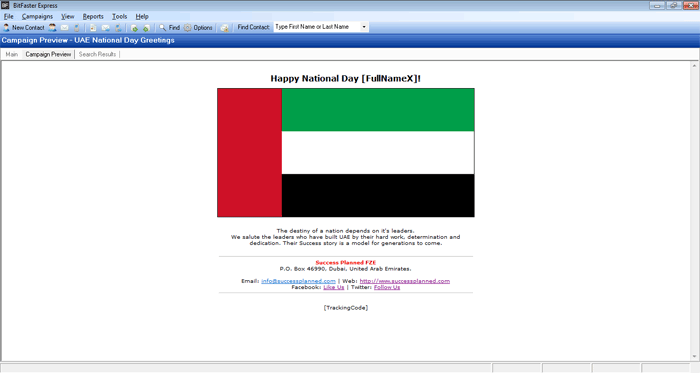
Step 7 - Preview Campaign
Having created the campaign, it is absolutely essential that you should preview it before you send it out. To preview an email campaign, right click on a campaign (as shown below) and choose Preview Campaign.
Your default web browser is opened and displays the HTML campaign as-it-is (without mail merging or personalization). System Variables (used for personalization) are case sensitive and must be enclosed in square brackets - like [FullNameX]. For details about the variables available, choose View > System Variables.
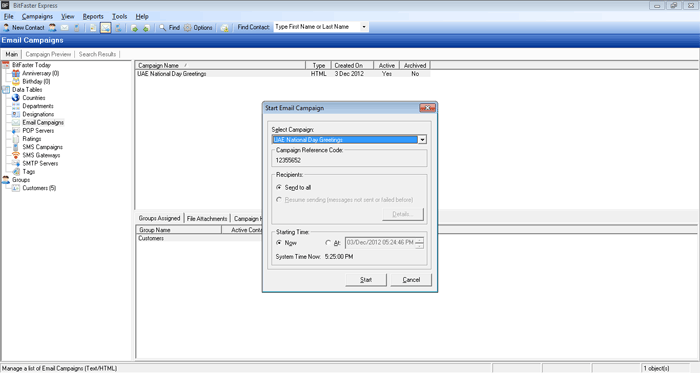
Step 8 - Send the Email Campaign
You are now ready to send your first email campaign! To start an email campaign, click on the Start Email Campaign icon in the toolbar (7th icon from the left). From the Start Email Campaign window, choose the campaign you just created and click on Start. WOW...you just initiated your first Email Campaign from BitFaster!
Step 9 - Generating Tracking Reports
BitFaster tracks your email campaign using the built-in add-on BitFaster Live (BFL). BFL shows live data for the latest campaign you have sent. It also automatically synchronizes the tracking information from BitFaster Results to your local BitFaster database. All the reports are generated based on this synchronized data.
To view the reports you can generate now, click on Reports > BitFaster Results menu. Most of the reports are generated and shown in Microsoft Excel. There are a couple of reports which are also generated using Microsoft Word.
To generate reports, you will require Microsoft Office XP or above on the computer.
